Each account is assigned to a different type. This feature can be used to group accounts and get meaningful totals. For example you can group all your bank accounts (i.e. assets) and when choose to view your bank accounts only, you will get a total for your assets.
This feature can also be useful to reduce screen clutter. You won't look at your Income and Expense accounts very often so there is no point in having them on the screen all the time
It is worth pointing out the main accounts type and their usage:
Assets for all bank accounts (such as current, checking, savings, etc) and other assets (shares, bonds, etc).
Liabilities accounts for credit cards and other liabilities (such as loans, mortgage, etc.).
Income accounts to log all your different incomes. For example you would have an account for you company so that whenever you get paid you create a transaction from Income:your_company to your current account.
All expense accounts (such as Travel, Food, Bills, etc) are created under the Expense category.
Finally all adjustments to balances for various reasons, or transactions which record opening an account should originate from equity accounts.
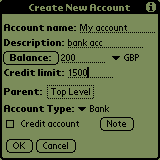
New accounts can be created from the account view (the main screen of the program) using the Account->New option from the drop-down menu. If you already created an account and want to alter its details, open the transaction register for the account by tapping on it and use the Account->Account Details option from the drop-down menu. The account-related information that can be manipulated this way is described in the paragraphs below.
The Account name field holds the short name of the account. This is the name that is going to be displayed by the program when referring to the account. A longer description can be provided in the Description field (this will soon be replaced by notes).
Next, you can enter a starting balance for the account (the default is 0). You can do so by using the calculator which can be obtained by tapping on the Amount button or by simply writing in the desired amount. Note that this will create an unbalanced transaction for the desired amount (or, if you are editing an existing account, it will create an unbalanced transaction for an amount that will take the existing account balance to the desired one). It is highly recommended that you create an equity typed account and assign all the transactions obtained from modifying the balance in such a way to this account. When you first create an account you can also select the currency used by this account. Note that once you select a currency for the account, you will not be able to change it by editing the account at a later date.
The Credit limit field is used to specify how much you can spend from the account if the balance would be 0. That is, the credit allowance for credit cards or overdrafts for current accounts. This sum is used to calculate the available totals in the account view (i.e. current balance + credit limit).
Accounts can be structured in a hierarchy. Any account can have several sub-accounts. For example the Expense account may have as sub-accounts the "Food" and "Travel" accounts. You can place the current account in such a hierarchy by choosing a parent account for it. So if you are creating an "Air" sub-account for the "Travel" account, you need to choose the "Expense:Travel" account as parent by tapping on the button next to the Parent label and choosing the account from the list.
The Account type drop-down can be used to assign a type to the current account. Account types are useful in getting various quick statistics from the program -- see the section called “Account types” for more information.
Finally, you have the option of marking the account as a Liability account. The idea with credit accounts is that the balance starts from 0 (as with normal asset accounts) and then transactions can be charged onto the account. That would mean that if you log you credit card expenses, the balance would always show as negative, as you spend money on your card and then it would go back up (hopefully to 0) whenever you pay off the credit card.
However, whenever you want to find out how much money you put on your credit card it is nicer to read, say `$30' than `-$30'. Checking the credit check-box will simply invert the sign of the balance displayed in the account list, for aesthetic purposes only.
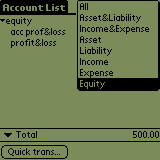
The account display selector is located at the top-right of the account screen, as shown in Figure 2.3
You can use this tool to select which account categories are displayed and, implicitly, the meaning of the 'Total' line on the bottom of the screen.
The meaning of the Total line depends on your current view. If you choose to see All accounts the Total will show the total of all unbalanced transactions in all accounts. Consider the following account distribution:
a Bank:Checking account, opened with a balance of 0 (of type `Asset')
an Expense:Misc account opened with a balance of 0 (of type `Expense')
an Income account with a balance of 0 (of type `Income')
Enter a transaction from Income to Checking for 20 units
Enter a transaction from Checking to Misc for 15 units
As the accounts are completely balanced, the total when displaying All accounts is 0. If you add 2 new transactions from Checking to no account (unbalanced) of 5 units each, the total will show -10, the amount which is unbalanced.
Similarly, if you display the Income/Expense accounts only the total will be income minus expense, i.e. your profit.
For the Asset&Liability category the displayed total signifies your assets (i.e. total in bank account minus total of credit card accounts). The signification of the total line for the other options (Asset,Liability Income, Expense, etc) is simpler -- just a total of the displayed accounts, within the same category.

